 Skip to content


Frolic Cushion - tips 'n tricks and some thoughts on needle turn applique
Ok, so you may see the Frolic Cushion and go oh I love it and I want to make it and then see it's needle turn and dismiss it. STOP right there! Frolic lends itself to all types of applique including fusible applique or machine. Choose the construction method that you've used before OR you could try needle turn. I have videos about needle turn applique available from my Bloom pattern which translate for this pattern as well. Scroll down to watch the videos, including one for making yo-yo's.
Frolic Cushion fabric choices
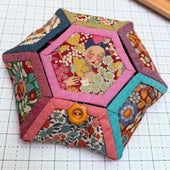
The Frolic Cushion has been made using Essex Yarn Dyed Linen for the background, I think it's Flax colourway - I used what I had available and it was prewashed. I'm not a prewasher usually but as I was appliqueing shapes to this cotten/linen I wanted to ensure that the fabric wouldn't shrink further once appliqued. So a quick wash and hot press after it was dry to get the backing ready.
The applique shapes and yo-yo's on the Frolic Cushion were all sewn using Liberty Tana Lawn. I find lawn is glorious to applique and a project like this using smaller amounts of lawn isn't a huge investment, for those of you that may not be used to Liberty. Visit your local quilt shop and buy some fat sixteenths and try out some Lawn. You can, of course, applique with patchwork fabric and most fabrics respond well, I would try out different patchwork fabrics and see how they handle applique.
When choosing a grouping of fabrics for Frolic Cushion, I started with the print I was going to use for my Rabbit, Liberty Tana Lawn Small Susanna Pastel (pictured below), and then chose other prints around this. I like to build a stack of fabrics and then lay them out, see how they're working with each other and I will often pull out more prints than I need and edit any out that don't quite fit.

My biggest tips with needle turn applique
First up, practice, practice and practice. Practice makes improvement and a cushion project like this is a perfect sized project to try needle turn. Do some test pieces, cut out a smaller square and applique one of the flowers. I really wanted to learn and improve my needle turn applique, I loved the way needleturn looked looked, so I kept at it.
We're all beginners at some point and taking the time to learn and improve is so satisfying when you start to see results that make you smile! I could do a 5 minute talk and point out all of the 'issues' with my needle turn on my Frolic Cushion, but what would be the point? It still looks fabulous and is one of my favourite makes.
With pieces of applique that have legs or finer details, when you're initially cutting out the piece, don't cut the seam allowances too small, leave more fabric around them to 'protect' the edges and only snip them once you're about to stitch. This will help prevent fraying and distortion of these pieces and also decrease any frustrations!
Oh and it might be obvious but it's called needle turn applique for a reason. Use the TIP (the sharp, pointy, owie part) and the edge of the tip of the needle to help turn under the seam allowance to stitch down. You'll notice the difference once you do that. Another beginners tip is to finger press the seam so you have a 'pre crease' of sorts to assist with turning under the seam allowance.
The 'right' tools do make a difference
When I say 'right' I mean right for you! Try out different needles and thread. Needles and thread do make a HUGE difference when it comes to needle turn applique. My personal favourite needles for needle turn are Bohin Long Applique Needles and these days I also use a needle threader. The eye on applique needles is super small and 80wt thread is also very fine. My 50+ year old eyes need some assistance! I'm a convert to 80wt Decobob by Wonderfil. It is super fine, disappears nicely into stitching and glides through fabric.
The rule of thumb is to match the thread colour to the applique fabric, not the background, however, I often will use a light silver thread for most of my applique, there are some instances where I will colour match if there's too much contrast and I can see stitches, but 90% off the time this works for me.
These Karen Kay Buckley 4" small perfect applique scissors are just that, perfect for snipping seams and getting into finer details. These scissors have a micro serrated blade that keeps fabric from slipping so cutting is more accurate and helps to prevent frayed edges.
I use Roxanne Applique Glue and this particular bottle as the tip is fabulous and prevents you from using a lot of glue. You really only need very small amounts of glue. We're not gluing down the piece that needs appliquing we're just lightly attaching it. Keep glue away from the edges and seam allowances so it doesn't interfere with your stitching. Roxanne's is very strong, so if you use too much and then want to reposition a piece once it's dry it might be a struggle to separate the fabrics. A also have been using Taylor Seville Applique Pins and I LOVE them.
A note about links
Please note: This email may contain affiliate links, meaning I earn a small commission if you make a purchase—at no extra cost to you!
Read more...
-
Bloom into Storage: Stitching the Blossie Basket (QAYG Hexie Bowl)
Meet Blossie - the little basket that blossoms Some sewing projects are all hustle; others feel like a warm cup of tea. Blossie Basket sits firmly ...
-
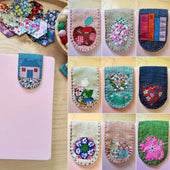
Introducing the Page Pal Bookmark: A Scrap-Friendly Magnetic Bookmark Pattern for Book Lovers
Calling all bookworms and makers! If you’re looking for a small but mighty sewing project, the Page Pal Magnetic Bookmark Pattern is perfect for yo...
-

The 2023 Patchwork Calendar!
Join the 2025 Patchwork Calendar Waitlist, you will be signed up to my Scrappy Digest newsletter, you can unsubscribe anytime! Be entered to win a...


1 comment
Thank you for explaining how to needle-turn applique and yo-yos.
———
Craftapalooza Designs replied:
You are welcome! Thank you for letting me know it was helpful.