Organising and managing scrap quilts by a scrap lovin' patchworker!
Share
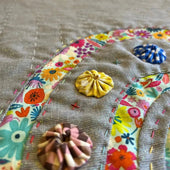
If you love making scrap quilts with a “million” fabrics, you’ll know the challenge of organising the entire process.
Over the years I’ve tried many methods. Here’s what works for me:
Read the Pattern
It sounds obvious, but don’t skip it. I’m a chronic pattern scanner myself, but taking the time to read every step helps you spot any special skills or notions you’ll need.
Gather Your Notions
Once you’ve read the pattern, collect everything you’ll need, including:
Fabric marker
¼″ ruler
Tracing mat and template plastic or acrylic templates (if needed)
Small self-healing cutting mat
Scissors or rotary cutter
Needles and thread
Bonus: Take the free Mini Masterclass on Hand-piecing Patchwork. It’s delivered by email and includes written, PDF and video instruction. You can complete it at your own pace.
Choose and Organise Your Fabric
Scrappy quilts need lots of fabrics. Here’s my process:
Pick a hero print. This special fabric might appear only once or twice, but it sets the palette.
Build a colour story. Pull all the fabrics you think you’ll use and stack them together.
Over-pull. I always choose more than I need so I can refine and edit as I sew.
Store in a Project Tub
Once your fabrics are selected, dedicate a tub/container to this quilt. If you only need part of a yard or metre, cut off what you’ll use now and return the rest to your stash.
Preparation for Sampler Quilts
Sampler quilts have many different blocks. For each block:
Make a small stack of coordinating fabrics - I love creating little fabric stories for each block.
Attach a paper label with the block name or number.
Be ready to swap or add prints as you see the quilt grow.
Stack fabrics for each block, curating little fabric stories for each block.
Jot notes right on your pattern or in a notebook (for example, “low-volume print for Piece A” or “stripe vs spot”).
Track your progress - consider downloading my free quilt WIP trackers to keep count of blocks cut and sewn.
Test Your Blocks
Before cutting everything:
Sew one block you’re confident with.
Sew one block you find challenging.
This helps you check your seam allowances, ensure you enjoy the process and confirm any new technique.
A note about seam allowances Most quilt patterns call for a quarter-inch seam; my seam allowances tend to be a little larger and that’s fine - as long as you’re consistent, your blocks will finish very close to the same size and fit together without issue.
Cutting and Preparation
Once you’re ready to dive in:
Cut and assemble your binding and backing - future you will thank you.
Create templates. If you don’t have acrylic templates, trace the paper ones onto template plastic.
Batch your work. I usually trace and cut 5 to 10 blocks, then sew them and repeat.
For blocks with lots of pieces, I write each template letter or number on the back of the cut shape with fabric marker/pencil. That way, if I pause and come back later, I can match the marking to the pattern and dive straight back in with minimal fuss.
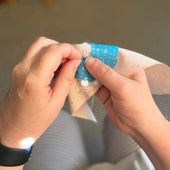
Sewing the Blocks
Sampler quilts: Follow the pattern’s recommended sewing order. I like to prepare two to four blocks at a time.
Single-block quilts: Cut and sew in batches, then lay out your blocks to check contrast and colour value as you go.
Use a Design Wall for Layout
Pin or press blocks and scraps on flannel-backed foam or batting to audition placements and colour balance before you commit to sewing seams. This prevents surprises in your final layout and ensures each block “reads” clearly in the overall quilt. If you don't have the wall space, lay them out on the floor and review that way.
Block Finishing
As each block is completed:
Trim any loose threads from the edges and back of the block - future you will thank you again!
Press with a seam roller or give a light iron. I avoid fully setting the seams at this stage so I have a little ease when piecing the quilt top together.
Store the blocks flat and in a block book or in a separate container to keep them undisturbed until you're ready to sew them into a quilt top.
Donate or Gift Unused Scraps
When your scrap stash grows too large, bag up unwanted scraps (sorted by size or colour) and donate them to guild charity quilts or fellow quilters. It’s both generous and sustainable, and you’ll reclaim precious studio space.
Keep Good Records
If you juggle multiple projects or take a break from sewing, track your progress with a WIP tracker or notes on your pattern. Record how many blocks are cut or sewn and any fabric notes so you can pick up right where you left off.
And Finally...
Enjoy the journey - scrap quilting is all about embracing variety and flexibility. With your fabrics organised and a clear plan in place, you’ll spend less time hunting for scraps or remembering where you left off and more time stitching.
Very informative. At the moment I’m having difficulties getting back into sewing, after a year of health issues. Pushing myself slowly to gather my wits and spend time in my sewing room, with so many projects that are half finished or new ones still in my head. ——— Craftapalooza Designs replied: Oh take your time! Pick the project you’d love to get back to and start there x
 Skip to content


1 comment
Very informative. At the moment I’m having difficulties getting back into sewing, after a year of health issues. Pushing myself slowly to gather my wits and spend time in my sewing room, with so many projects that are half finished or new ones still in my head.
———
Craftapalooza Designs replied:
Oh take your time! Pick the project you’d love to get back to and start there x
[image: Craftapalooza Designs] <https://mysig.io/P4Grmnqk> Nic Vaughan Craftapalooza Designs www.craftapalooza.com <https://mysig.io/zE4VD1d6> nic@craftapalooza.com PO Box 99, Greenwood WA 6924 [image: Craftapalooza Designs] <https://mysig.io/rlL1geQ7> [image: Craftapalooza Designs] <https://mysig.io/abR1nN3O> [image: Craftapalooza Designs] <https://mysig.io/LB4eDamY> [image: Craftapalooza Designs] <https://mysig.io/GbL1goNO> [image: Craftapalooza Designs] <https://mysig.io/Je4ED8NB> <https://mysignature.io/editor/?utm_source=expiredpixel>